
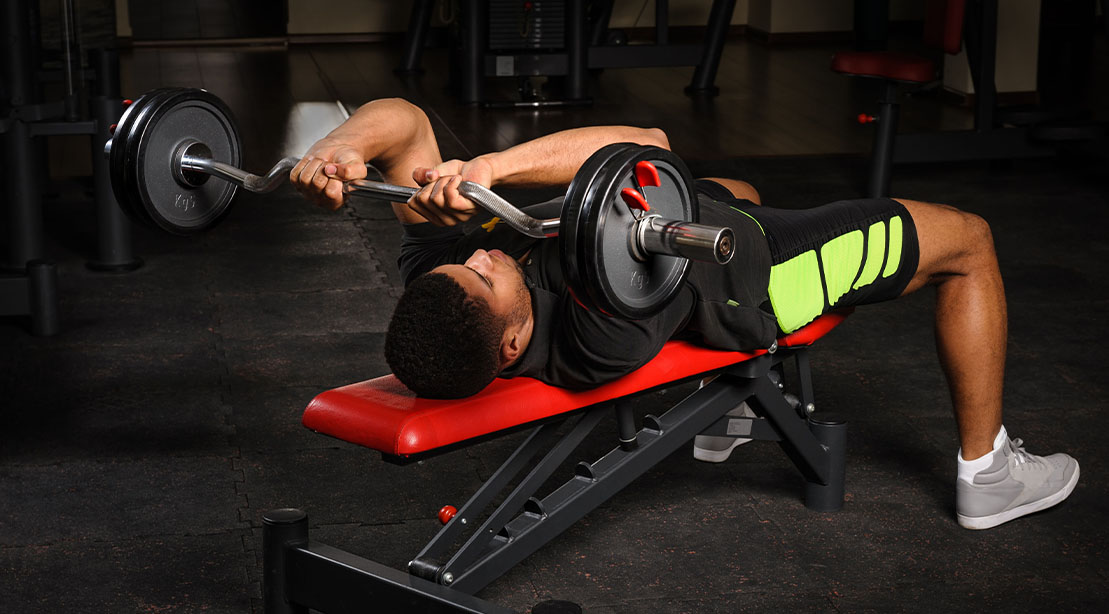
If you’re looking to improve your triceps size and strength, look no further than the JM press. It enhances triceps lockout strength like few other exercises, making it a favorite among serious lifters seeking horseshoe triceps or a better bench press.
But there’s a catch: The JM press is often performed poorly because of its technical demands. It’s not a traditional triceps extension or press. It’s a hybrid. Small details like elbow position, bar path, and touch point make a huge difference. Miss them, and your elbows will let you know.
This checklist breaks down those technical steps so you get the most out of this lift. Learning each step may feel slow, but with repetition, it becomes automatic. When it does, the JM press becomes an excellent tool for building triceps size and improving your bench press.
The Ultimate JM Press Checklist
Locking in your set-up and knowing where your body is in space will give you more confidence to build the triceps of your dreams.
Step 1: Body Position on the Bench
The JM press targets the triceps, but like any bench-press-type movement, it starts with your body position on the bench. A stable position keeps your elbows and bar path predictable from rep to rep.
- Lie back so your eyes are under or slightly behind the bar
- Keep your head, upper back, and glutes in contact with the bench
- Set your upper back as your main point of contact
- Maintain a slight natural arch without flaring your ribs
Internal cue: Feel your upper back heavy on the bench. External cue: Eyes under the bar.
Coach’s Tip: If you’re shifting or adjusting after setting your scapular base, stop and lock it in.
Step 2: Foot Position and Leg Drive Setup
The JM press doesn’t require aggressive leg drive, but your lower body still needs stability. Improper foot placement affects the upper body, making it harder to control the bar path. Think of your legs as anchors because they keep everything above them steady.
- Plant your feet firmly on the floor
- Place feet where you can maintain consistent downward pressure without hip movement.
- Keep your knees slightly out for better stability
- Apply tension to the floor while still keeping your hips on the bench
Internal cue: Feet planted, knees out. External cue: Drive the floor away.
Coach’s Tip: If you feel your feet or hips shift at any time, you’re probably using too much leg drive.
Step 3: Grip Width and Hand Position
The grip width is vital for elbow tracking, bar path, and the amount of tension created. Too wide, and it turns into a bench press, or too narrow, and your wrists and elbows will tell you about it. Your ideal grip width allows for better control and, hopefully, bigger triceps.
- Take a grip slightly narrower than your regular bench press
- Keep your hands even—use the knurling as a guide
- Place the bar low in your palm, not in your fingers
- Start with your wrists stacked over your elbows, but allow slight deviation as the bar tracks toward the face
Internal cue: Crush the bar in your hands. External cue: Bend the bar.
Coach’s Tip: If your wrists hyperextend or you lack control, rerack and reset your hand position.
Step 4: Upper-Body Tension
The JM press doesn’t require an aggressive powerlifting retraction, but it still demands a stable upper body. Think of this as controlled stability: you want enough tension to guide the bar without restricting movement.
- Set your shoulder blades lightly down and back
- Keep your ribs in line with your hips
- Engage your lats slightly to create a stable self
Internal cue: Tension in your lats and core External cue: Squeeze the oranges in your armpits
Coach’s Tip: If you feel you haven’t gained control of the bar, your upper body isn’t set. Reset your tension before continuing.
Step 5: Breath and Brace
A solid breath and brace keep your core braced and your elbows on a better lifting path. The breath and brace keep your upper body stable so the prime movers can do their job.
- Take a deep 360° breath
- Feel the air in your belly, sides, and lower back
- Brace your core as if you’re preparing to take a punch
Internal cue: Breath in before movement. External cue: Lock it in.
Coach’s Tip: After finishing the rep, reset your breath and brace.
Step 6: Elbow Position
The correct elbow position is the make-or-break step. This position creates the distinctive hybrid movement pattern that makes the JM press so effective—part press, part extension. Get this right, and your triceps will thank you.
- Set your elbows slightly forward of the bar, not flared wide and not tucked tight
- Limit their side-to-side movement throughout the rep as your elbows travel slightly forward.
Internal cue: Hinge at the elbows External cue: Point your elbows toward your feet.
Coach’s Tip: Notice excessive elbow movement, too much weight, or a loose setup? Reset and take control before you continue.
Step 7: Bar Path and Touch Point
The JM press is all about the bar path. Lower it like a bench press, and you lose emphasis on the triceps. Lower it like a skull crusher, and the elbows say no. The middle ground is a controlled, diagonal path. This shorter, angled range of motion enhances the JM press’s effectiveness.
- Lower toward the base of the throat/upper chest junction
- Let the bar drift toward your face, then ‘hinge’ at the elbows into a shortened range before extending back out.
- Touch somewhere between your upper chest and chin/throat area
Internal cue: Feel the tension in your triceps External cue: Bring the bar toward your face.
Coach’s Tip: If the bar is landing low on your chest or near your forehead, your bar path is off. Reset and focus on a tighter, more direct path.
Step 8: The Green Light Checklist
Before lifting, take a quick second and run through this checklist.
- Feet planted
- No excessive leg drive
- Grip tight and even
- Wrists stacked over elbows
- Elbows slightly forward and fixed
- Lats & shoulder blades lightly engaged
- Brace locked, ribs controlled
If everything feels tight and controlled, you’re ready to go.
Common JM Press Mistakes That Hurt Your Progress (Fixes)
As the JM press is a hybrid exercise. mistakes happen. Clean them up, and you’ll feel it exactly where you should—your triceps.
Turning It Into a Skull crusher
The elbows drift back, and the bar travels over your face like a traditional extension.
The Fix: Bring your elbows slightly forward and keep them still. Think “hinge at the elbows and guide the bar along a diagonal path toward your upper chest.
Turning It Into a Close-Grip Bench Press
The bar drops straight down to your chest, and you press it like a close-grip bench press.
The Fix: Lower toward the base of the throat/upper chest junction, then press back over your shoulders.
Letting the Elbows Flare Out
Elbows drift wide, shifting the load to the chest and shoulders.
The Fix: Set your elbows slightly forward before the first rep, and keep them there. Use a lighter weight if you can’t maintain it.
No Eccentric
The bar drops too quickly, causing excessive elbow movement and a loss of tension.
The Fix: Slow the eccentric. Think “own the way down.” If you can’t control the bar, the weight is too heavy.
Wrapping Up
The JM press can blow up your triceps and boost your bench—but only if you nail the execution. Control the descent. Fix your elbows and own the bar path. Train it right, and your pressing strength and triceps will show the results.